The Elev8+ Strategy Guide: Mastering Institutional Reversals
We really hope you are starting to understand the Elev8+ System and Indicators. If you are still reading this, you are likely tired of retail-style tools that lag, repaint, or flood your chart with signals in low-quality areas. Elev8+ was built to solve that.
Elev8+ is a suite of 4 indicators designed to work together or separately: Elev8+ Pro (signals + sweep levels), Market Map (HTF + sessions/VWAP structure), Market Extremes (exhaustion boundaries), and Momentum Gaps (Inefficiencies/FVG targets & Order Blocks). The core execution model stays the same: Level Location → Sweep → Rejection → Confirmation → Rotation.
The "Sniper" Mindset 🎯
Retail traders act like machine gunners—spraying bullets (trades) at everything that moves.
Elev8+ is a Sniper Scope. It highlights the exact kill zone (Liquidity Sweep) and tells you when to pull the trigger (Reversal Signal).
Your job is to wait and stay disciplined.
What Is a Liquidity Sweep? (The Trap)
Institutional participants need liquidity to execute size. They don't buy at random prices; they buy where your stop loss is. Large orders need fuel to move, they can't just market buy thousands of contracts. That's why often times price is manipulated first in the opposite direction to fill orders and soak up the liquidity before they can make the real move.

- The Trap: Price pushes just beyond a major high/low to trigger stops and retail breakout traders.
- The Turn: Once the stops are eaten, price aggressively reverses.
- The Result: Breakout traders are trapped, and the "Smart Money" is positioned for the real move.
Elev8+ is designed to help you recognize this trap in real-time and be on the right side to trade in alignment with institutional order flow.
Part 1: The Core Indicator Layers (Elev8+ Pro)
Inside Elev8+ Pro, there are four core layers that stack into a clean reversal decision. You do not need every module turned on to trade well, but you should understand what each layer contributes.
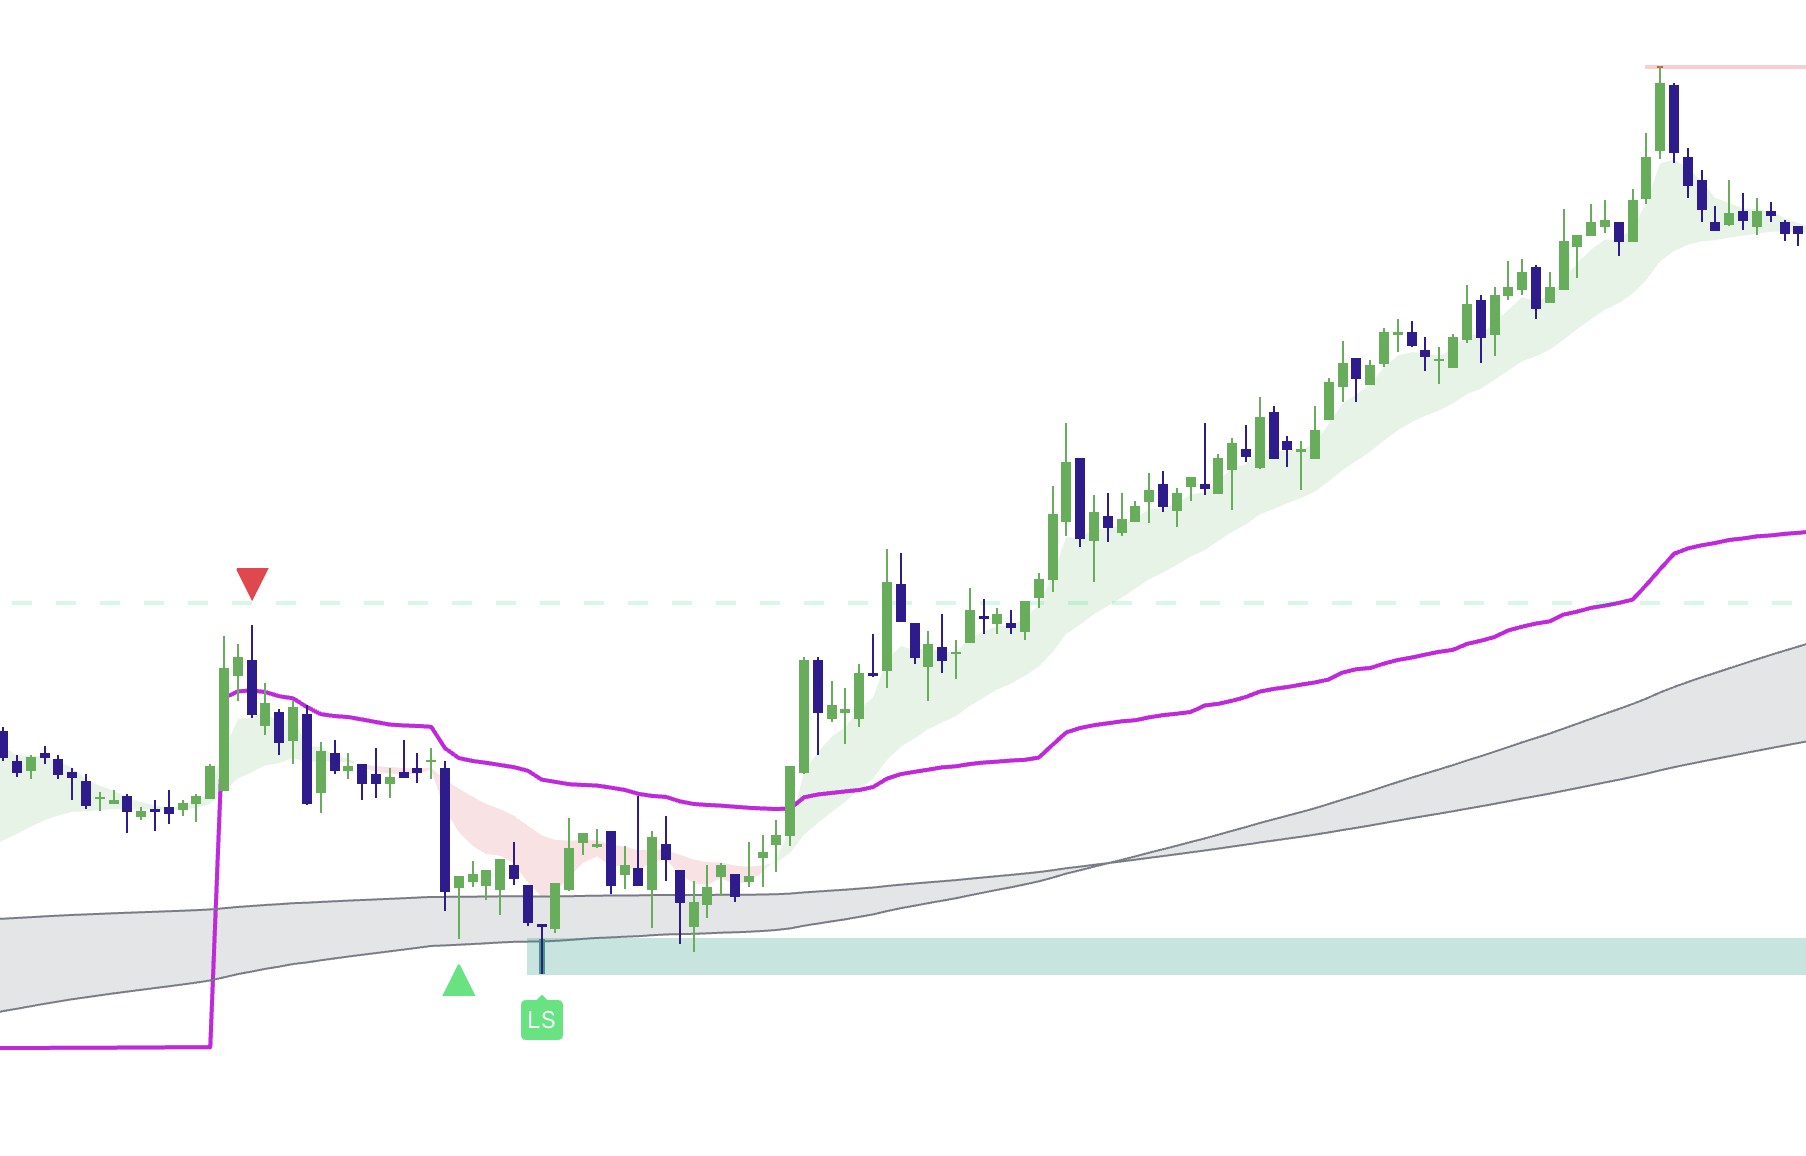
This is your "Where." These are the auto-plotted lines on your chart (PDH, PDL, Weekly Highs).
Rule: No Level = No Trade. We do not trade in empty space with no resting liquidity.
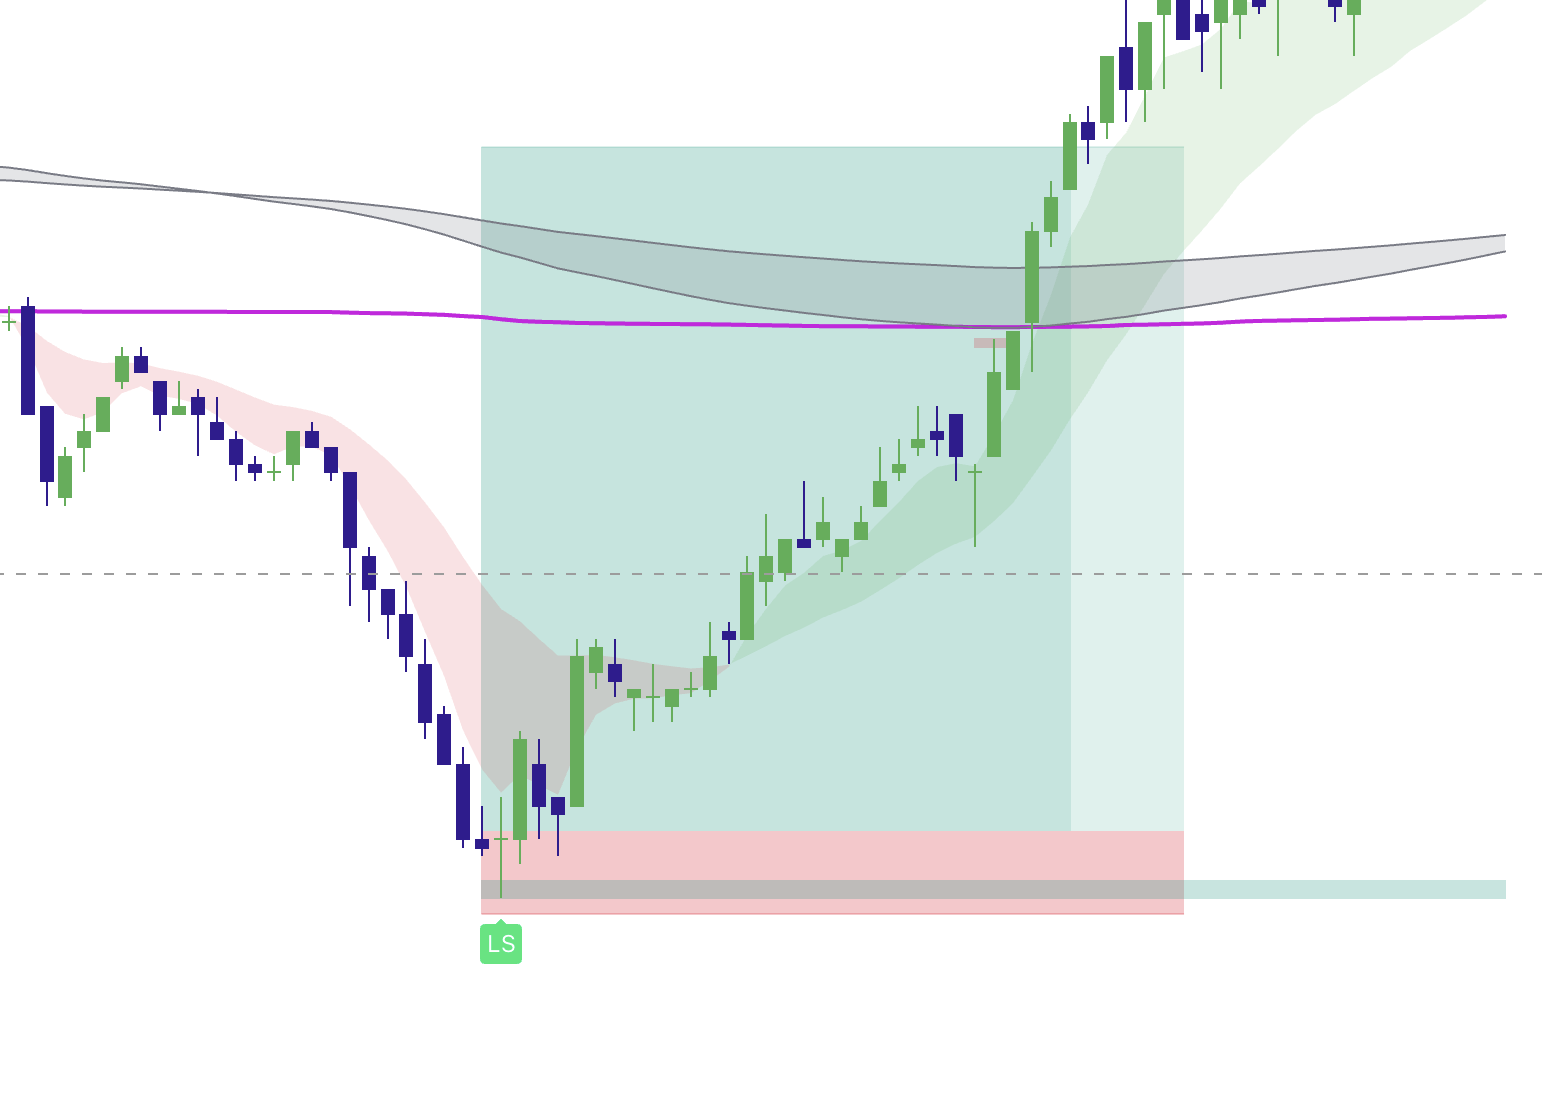
This is your "What." The horizontal Liquidity Sweep zones signals appear when price probes a level and rejects.
Rule: Look for a wick that pierces the level but closes back inside quickly.
This is your "When."
Green Triangle: Bullish Reversal (Buy).
Red Triangle: Bearish Reversal (Sell).
LS Label: Premium, high-confidence signal.
This is your "Safety." The colored ribbon tells you the dominant trend.
Rule: Ideally, trade lower timeframe reversals (1m, 2m, 5m, 15m) that align with the higher timeframe EMA ribbon on the 1h, 4h, or 1d chart (e.g., catching a pullback in an uptrend).

- Market Map: confirms major session structure, and VWAP context so you’re trading the right location.
- Market Extremes: helps avoid low-quality signals and prioritize reactions near extreme boundaries.
- Momentum Gaps: highlights inefficiencies (gaps/FVG-style zones) that often act as rotation targets or “checkpoints.”
Part 2: Anatomy of a Perfect Trade
Stop looking for random signals. Look for this exact sequence. Memorize it.
The "Perfect Trade" Checklist
- The Approach: Price moves fast into a major level (e.g., Prior Day Low or Session Low). Bears look strong.
- The Pierce: A candle spikes through the line. Breakout traders jump in short.
- The Rejection: The candle closes back above the line, leaving a long wick.
- The Signal: A Green Triangle or LS Label appears under that candle.
- The Entry: You enter Long on the open of the next candle.
- The Target: You aim for VWAP or the opposing liquidity level (Previous Day High, Session High).
Optional: Use Market Map to validate the next magnet (VWAP / session midpoint / previous session ranges), and use Momentum Gaps to map rotation checkpoints on the path to value to either trail stop loss or move stops to breakeven.
Part 3: Refining Your Edge (Pro Tips)
How do you separate the winners from the losers? Use these filters.
- Only trade signals that happen at Tier 1 Levels (PDH/PDL, Weekly/Monthly, or Session High/Low).
- Ignore signals that happen in the middle of the chart range or old levels that liquidity has already been taken.
- Best Time: 9:30 AM - 11:00 AM EST (NY Open) or 3:00 AM - 4:00 AM EST (London).
- Worst Time: 12:00 PM - 1:00 PM EST (Lunch Chop).
- If the EMA Ribbon is steeply angled against you, be careful fading a strong trend.
- If the Ribbon is flat or you are trading with the Ribbon color (e.g., Green Triangle while Ribbon is Green), your odds increase.
- Market Extremes: prioritize sweeps near extreme zones; reduce size or skip when price is stuck mid-range.
- Market Map: favor sweeps that occur at obvious HTF/session levels, not minor intraday noise.
- Momentum Gaps: use gap zones as rotation targets and profit checkpoints (helps prevent “hold and hope”).
Part 4: Risk Management (How to Stay Alive)
Elev8+ gives you the edge, but Risk Management keeps the money.
1. Stop Loss: Always place your stop just beyond the "Sweep Wick." If price breaks that wick, the trade is over.
2. Take Profit: Pay yourself at VWAP. Do not be greedy. Reversals often snap back to the mean and then chop.
3. The "Two Strike" Rule: If you take two losses in a row, walk away. It's likely a trend day, and fading is dangerous.
Summary: Your Daily Routine
- Is there a Level? (Yes/No)
- Is there a Sweep Wick? (Yes/No)
- Did the Candle Close? (Yes/No)
- Is there a Signal? (Yes/No)
- Is it Lunch Time? (No!)
The Elev8+ system does the heavy lifting by scanning for structure. Your job is simply to be the Sniper: Wait for the setup, verify the checklist, and execute without hesitation.